Latest Movie :
Recent Movies

How To Use Backdated FireFox Add-ons in Your New Version Mozilla FireFox Browser


  A Very Simple Tricks for How To Use Backdated FireFox Add-ons in Your New Version Mozilla FireFox Browser will be described here.

Follow The Step in This Video Tutorial

Just Follow The Instraction Given Below.......
1. First you have to go and find the desire add-ons for Firefox that not comparable with your current version
    Of Mozilla Firefox browser.   
2. After that you have to copy the add-ons link
3. Open any browser like Chrome not Firefox and Paste Link.
4. Click to download button and select Download anyway.
5. After download desire add-ons you have to open it with WinRAR or any other zip utility.
6. You have to open install.rdf file with notepad.
7. Then edit maximum supported versions with desire one.
8. Save and overwrite add-ons.
9. Install it in your Mozilla Firefox browser.

Simply use this instruction or use video tutorial. If you face any problem contact me by commenting on this page.....


How To Clean your RAM using Notepad


My friends of me ask where can I download a software which can keep my RAM free? And I Learn these software are nothing but using some lines of code which can be implemented by using notepad or any editor tool. So if any one does not have any software, you can use it by doing the following things which I am going to mention.
Steps to Clean Your RAM Using Notepad:
Step 1: Open Notepad
Step 2: Type FreeMem=Space(10240000000)
Step 3: Save it as “CLEANER.VBS” in any location you like.
Step 4: You can edit the code and write 512 instead of 1024 if you own a 512mb RAM or change to anything you like.
Step 5: Run it !
After this final step your RAM will be free.
Hope you enjoyed it.
Please Pass comments on it..

How to Speeding Up an Old PC


Now a days it is common Question that How to Speeding Up an Old PC ? because latest components coming out every month, your trusty desktop can seem like it is an old classic. The sleeker models with all the upgrades can make your computer unit feel like it is truck beside a sports car.  But there are so many things that you can do to make it perform like it is new.
Here are a few things that can help you do that:
Get Space
Everyone needs space, even your computer. We end up with more than a few bytes of photos, music, movies and programs in this digital world. All this data takes time to read and process. These precious milliseconds add up and can make simply booting up your computer and surfing on the net feel like an eternity.
There are 3 things you can do to solve the space issue. First, cleanup your hard disk. Delete temporary internet files, empty your recycle bin and uninstall programs that you rarely use. If you still have a lack of space, transfer your files to an external drive. This way your computer does not always have to process it when you boot up. If all fails, consider replacing your current hard disk with a solid-state HD. Without any moving parts, the speed of processing and writing files takes less time. It’ll make downloading and processing files faster.
Add RAM
You do not need to replace your computer to get a faster unit. Look into buying and installing a higher RAM card. The difference can be quite exponential between a 2 gig and a 4 gig RAM card.  You’ll be able to play better games and run memory heavy programs smoothest. If you are into watching high definition movies or playing games that are heavy on graphics, consider buying a better video card. This way you can get the extra memory to keep your computer from laughing.
Reinstall Your OS
If none of the above is working for you, consider “renewing” your computer by reinstalling your operating system. It can be quite tedious to do, but will be worth the effort. Reinstalling your OS will help you remove malware and other programs that slow down your computer. You can also start fresh by choosing the right programs and file management protocols to keep your computer zipping along smoothly.
The Bottom Line:
Don’t just be consumers; instead, think of yourself as a “tuner”. Consider modifying and upgrading components of your computer before you head out and buy cheap desktops. It’ll save you a lot of money, and, most of all, can be quite fun to do.

Easiest Ways to Backup & Restore Firefox Addons and Settings


With the support of thousands of addons, plugins and themes, Firefox takes the lead among all web browsers. You can customize the way you want with the help of  these plugins. But when so many of those addons and plugins are installed at the same time, firefox not only gets heavier but it also becomes necessary to take backup of the settings in case anything goes wrong with the browser.
You might also want to transfer settings and plugins of Firefox from one PC to another. So you can save time by installing each and every addon one by one. You can offcourse do the task manually by downloading addons and apply the same settings on each new system.
Fortunately, there are some tools and addons for firefox specially designed to take backup of everything installed with your firefox. From bookmarks, toolbar, menu, themes, plugins, addons to every bit of the settings.
Here are some ways you can take backup of your Firefox easily using these tools and addons....
 
MozBackup is a simple utility for creating backups of Firefox. It allows you to backup and restore bookmarks, mail, contacts, history, extensions, passwords, cache etc. The easiest and probably the fastest way to take and restore firefox backups.

FEBE (Firefox Environment Backup Extension) allows you to quickly and easily backup your Firefox extensions. In fact, it goes beyond just backing up — It will actually rebuild your extensions individually into installable .xpi files. Now you can easily synchronize your office and home browsers.
 CLEO
CLEO (Compact Library Extension Organizer) is a Firefox extension that works with FEBE to package any number of extensions/themes into a single, installable .xpi file. 
OPIE (Ordered Preference Import/Export) is a Firefox extension that allows you to import and export your installed extension preferences. This is useful when installing extensions in a new profile, or synchronizing multiple Firefox installations. 

How to Change Windows 7 Logon Screen


No Third party software utility is needed to change Windows 7 Logon Screen. Customizing Windows 7 is much easier when compared to earlier versions by doing some Registry edit. In this article I will show you how to change Windows 7 Logon Screen using registry edit in simple steps.

Steps to Change Windows 7 Logon Screen

1. Press Windows Key + R to launch Run. Type REGEDIT and hit enter.
2. Now navigate to,
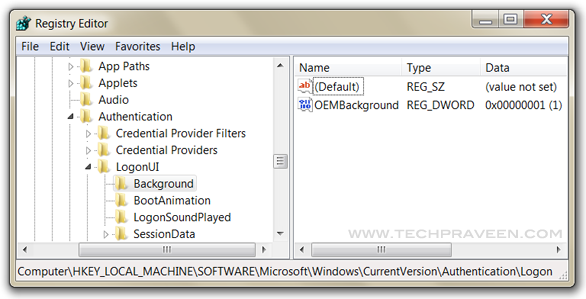
HKEY_LOCAL_MACHINE\SOFTWARE\Microsoft\Windows\CurrentVersion\Authentication\LogonUI\Background
Change value of OEMBackground to 1.
                

4. Now navigate to C:\Windows\System32\oobe, create folder “info”, double click it and create another new folder “backgrounds”.
5. Now place your desired picture inside logon file into C:\Windows\System32\oobe\info\backgrounds. In my Windows 7 I use Alienware themes so changed Windows 7 Logon Screen with Alienware picture.

                     
6. Rename the file to backgrounddefault.jpg. (Please NOTE: Images must be less than 256kb in size).
7. Press Windows Key + L to view your customized Logon Screen. Else Reboot your Windows 7 to apply changes.
That’s it......

How to uploads your files to multiple file hosting sites


There are many Uploading sites who uploads your files to multiple file hosting sites. But there are many limitations and all uploading site not support famous hosting site like mediafire, rapidshare, 4shared, hotfile etc. Now i am going to tell you a best free uploading site www.embedupload.com

Follow The Step in This Video Tutorials


---------: Frequently asked questions :---------
  
  • What is Embedupload.com?
    Embedupload.com uploads your files to multiple file hosting sites. You just need to upload your file to our server once, it will be automatically uploaded to several free file hosts like RapidShare, MegaUpload. After the file is uploaded to our server, you will get the link to the download page which contains the all the download links. We offer also collector`s zone account to upload your file across your account
  • How do I upload a file?
    Go to Embedupload.com and click the Browse button near the middle of the page. A file dialog box will appear on your screen. Select a file you want to upload. Then click the Upload button and wait for your file to finish uploading. That's it, the rest is done by us. 

  • Why some download links show failed?
    While uploading, some file host may be down temporarily. We do retry and if its not successful even after two attempts the file status is changed to Failed. If you try after few minutes it should probably work. Alternately you can check that particular file host website to see if there is any problem.
  • Why should I use Embedupload.com?
    Embedupload.com is a leading provider of uploading that distribute your file to multiple hosting sites.If your bandwidth demands exceed what your regular web hoster is capable of delivering, you can upload once in Embedupload.com and distribute every where.also we will show your site name in file downloading page.
  • The requested file is not found. What does that mean?
    If you see 'The requested file is not found” message when trying to download a file, it means that the file has either been removed by its owner or by support service due to a complaint from the trademark owner. Or it may be that the file-hosting period has expired since there were no attempts to download the file for 3 months. Whatever the case, the file is no longer available unfortunately.
  • The file I need can’t be downloaded completely. What should I do?
    There could be a connection fail during the file download process. So please try to download the file again or try download from other uploadng site that Embedupload.com provided. However, if the file size remains the same, then the file itself may be corrupted. In this case, we advise you to contact the person who provided you with the link and ask him to re-upload the whole file to the service once again.
  • What files can I upload to EmbedUpload.com?
    You're able to upload almost any files that do not break the law and copyright. These could be your personal files or the ones you use at work. There is no limitation on file format. It is possible to upload split files as well as archives consisting of multiple volumes.

How to Convert Chrome extension for Firefox or Safari


Learning how to Convert Chrome extension for Firefox or Safari without downloading it from Chrome Web Store. This tutorial is simple, not so confusing or complex, it uses simple Dragging and Dropping of google chrome extension.


Try Our Video Tutorial

To install the Convert Chrome extension for Firefox or Safari without downloading it from Web Store, you need to follow the step described below:

  1. go to chrome.google.com/extensions
  2. Search for your extension, that you want to Convert for Firefox or Safari.
  3. Get the Extension ID of the chrome extension
  4. Go to http://www.extensionfactory.com/labs/conversion/
  5. Paste  Extension ID  and hit Convert.
  6. After few moment you can see that Conversion completed
  7. Hit Download  for use it at  Firefox or Safari.
Keep visiting us our next tutorial is "How to use Backdated add-ons on new version Firefox ?"

How to Download an Extension (.crx file) WITHOUT installing it?


Learning how to install Google Chrome Extension without downloading it from Chrome Web Store or installing Extension manually by downloading CRX file. This tutorial is simple, not so confusing or complex, it uses simple Dragging and Dropping of google chrome extension.
google chrome extensions How to Download an Extension (.crx file) WITHOUT installing it? 
To install the Google Chrome Extension without installing directly from web store, you need to follow the step described below:
  1. go to chrome.google.com/extensions
  2. Search for your extension, that you want to add in your google chrome
  3. Get the Extension ID of the chrome extension
  4. Go to other browser then google chrome one, [Not in Chrome]
  5. Paste this url : https://clients2.google.com/service/update2/crx?response=redirect&x=id%3D~~~~%26uc
  6. Replace ~~~~ with the extension ID. For Example, the chrome id for SEO For Chrome Extension is “oangcciaeihlfmhppegpdceadpfaoclj”, if i want to download this extension, i will put below URL to download this extension in other browser:
    https://clients2.google.com/service/update2/crx?response=redirect&x=id%3Doangcciaeihlfmhppegpdceadpfaoclj%26uc
  7. and hit Enter.
After following above steps, you will get the CRX File of your Google chrome Extension. Just Drag that CRX file to Google Chrome and Drop it in Chrome body. Your Google Chrome Extension is ready to use. icon smile How to Download an Extension (.crx file) WITHOUT installing it?
This is the simple way to get the Chrome extension’s CRX File for your local extension folder of chrome.

How to Direct Download Any Torrent Using IDM/download managers/accelerators


Today I am here with the latest trick to download torrents using IDM/download managers/accelerators or any other software. Maximum torrent size does not exceed 8 Gb for free download.......

                                       You Can follow the video Instraction Given Below


Use these simple steps to direct download any torrent
  • To download torrents using IDM you have to search and find the desired torrent file
  • Now get the download link of the torrent file or download the torrent file
  • Visit http://zbigz.com and paste the download link or upload the torrent file
  • Now you can click “Go Free” button to download Torrents using IDM for free
  • Wait for a while and your download link will be available with the download button.
  • Now you can download your torrent using the IDM/download managers/accelerators.

Top 10 keyboard shortcuts everyone should must know


By using keyboard shortcuts can greatly increase your productivity, reduce repetitive strain, and help keep you focused. For example, highlighting text with the keyboard and pressing Ctrl + C is much faster than taking your hand from the keyboard, highlighting the text using the mouse, clicking copy from the file menu, and then putting your hand back in place on the keyboard. Below are our top 10 keyboard shortcuts we recommend everyone memorize and use.
Ctrl + C or Ctrl + Insert
Copy the highlighted text or selected item.
Ctrl + V or Shift + Insert
Paste the text or object that's in the clipboard.
Ctrl + Z and Ctrl + Y
Undo any change. For example, if you cut text, pressing this will undo it. This can also often be pressed multiple times to undo multiple changes. Pressing Ctrl + Y would redo the undo.
Ctrl + F
Open the Find in any program. This includes your Internet browser to find text on the current page.
Alt + Tab or Alt + Esc
Quickly switch between open programs moving forward.
Tip: Press Ctrl + Tab to switch between tabs in a program.
Tip: Adding the Shift key to Alt + Tab or Ctrl + Tab will move backwards. For example, if you are pressing Alt + Tab and pass the program you want to switch to, press Alt + Shift + Tab to move backwards to that program.
Tip: Windows Vista and 7 users can also press the Windows Key + Tab to switch through open programs in a full screenshot of the Window.
Ctrl + Backspace and Ctrl + Left or Right arrow
Pressing Ctrl + Backspace will delete a full word at a time instead of a single character.
Holding down the Ctrl key while pressing the left or right arrow will move the cursor one word at a time instead of one character at a time. If you wanted to highlight one word at a time you can hold down Ctrl + Shift and then press the left or right arrow key to move one word at a time in that direction while highlighting each word.
Ctrl + S
While working on a document or other file in almost every program pressing Ctrl + S will save that file. This shortcut key should be used frequently anytime you're working on anything important.
Ctrl + Home or Ctrl + End
Move the cursor to the beginning or end of a document.
Ctrl + P
Print the page being viewed. For example, the document in Microsoft Word or the web page in your Internet browser.
Page Up, Space bar, and Page Down
Pressing either the page up or page down key will move that page one page at a time in that direction. When browsing the Internet presses the space bar will also move the page down one page at a time. If you press Shift and the Space bar the page will go up a page at a time.

Microsoft Word 2007 Tips, Tricks, and Tutorials


Microsoft Word is one of the most popular word processors. Here is some Tips, Tricks, and Tutorials for Microsoft Word 2007.

1. Change full-justification formatting
When full justification is applied to a paragraph, Word ensures that text is vertically aligned on the left and right of the page by adjusting the spacing between words. While this usually isn't a problem, there are occasions when it can lead to a lot of visible white space.
By opting to use the justification style that's utilised in WordPerfect, the spacing between individual letters on each line is adjusted to allow for better-looking text when it spans from margin to margin.
To activate this option, click the 'Office' button, followed by 'Word Options', and then click the 'Advanced' link on the left. Scroll to the bottom of the advanced options and expand the 'Layout Options' entry. Now you just need to tick the box labelled 'Do Full Justification The Way WordPerfect 6.x For Windows Does', then click 'OK'.

2. Configure paste options
Word tries to be helpful when copied text is pasted into a document by automatically retaining the source formatting, while providing the option to change the text to match the formatting of the current document.
To avoid having to choose formatting options every time text is pasted, click the 'Office' button, followed by 'Word Options', then move to the 'Advanced' section. Under the 'Cut, copy and paste' heading, use the first four drop down menus to choose a default setting for format pasting.
While configuring these options, untick the box labelled 'Show Paste Options Buttons' to prevent the formatting options pop-up from being displayed in the future.

3. Use a hanging indent
One of the less frequently used means of formatting paragraphs is the hanging indent. This is where the first line is not indented, but all of the rest are.
Select the paragraph you'd like to format in this way, move to the Home tab and double-click the arrow icon in the lower right-hand corner of the 'Paragraph' pane.
On the Indents and Spacing tab, use the 'Special' drop down menu in the middle of the dialog to select the 'Hanging' option and then indicate the indentation level. To apply the indent, click 'OK'.

4. Show and hide the ribbon
For many people, the ribbon interface used in Office 2007 is a great step forward, while others find it somewhat overwhelming. If you fall into the latter category, you'll be happy to know that the ribbon can be temporarily hidden to provide you with a larger working area and clear away the clutter.
It's also worth noting that the ribbon can quite easily be hidden by accident, so if this has happened, these tips can be used to show and hide it as required.
The first option is to click the down arrow icon at the end of the Quick Access Toolbar and tick or untick the 'Minimize the Ribbon' option. This menu can also be accessed by right-clicking anywhere on the ribbon.
The third option is to double-click one of the tabs at the top of the ribbon to toggle the ribbon on and off. Finally, you can always use the keyboard shortcut – simply press [Ctrl]+[F1].

5. Number pages
It's easy to configure a header and footer for your Word document so the page number is displayed on every page. In many instances, though, a document will have a title page for which a number is not required. Set up page numbering as required and then in Word 2007 and 2010, move to the Page Layout tab before clicking the button in the lower right-hand corner. Switch to the Layout tab and tick the box labelled 'Different first page', before clicking OK.

6. Back up the Quick Access Toolbar
If you've spent a great deal of time customising the Quick Access Toolbar (QAT), it's all too easy to forget about it if you ever need to reinstall Windows. Thankfully, you can create a backup of the toolbar, which means it can be brought back without any hassle, or copied to other machines that you work with.
In Windows XP, use Explorer to navigate to 'C:\Documents and Settings\[username]\Local Settings\Application Data\ Microsoft\Office', while in Windows Vista or 7, you should head to 'C:\Users\[username]\ AppData\Local\Microsoft\ Office'.
Here you'll find a file called 'Word.qat' – this can be duplicated for backup purposes, or copied to another computer.

7. Remove formatting
If text has been formatted and you change your mind about how it should appear, click the word in question, or select a section of text, and press [Ctrl]+[Space] simultaneously. If the formatting has been applied with a style, press [Ctrl]+[Shift]+[N] and it will then revert to the default style.

8. Adjust font spacing in headings
Text space can be adjusted to help ensure that a heading fits on a single line, rather than wrapping onto a second, or expanded to reduce the amount of white space in a line.
Select a line of text, right click and select Font from the context menu. Letter widths can be adjusted by selecting a new size from the Scale dropdown menu, but it's also possible to adjust spacing. Use the up and down arrows in the Spacing section to expand or compress it.
 
Support : Creating Website | Johny Template | Mas Template
Copyright © 2011. bdLinkloads - All Rights Reserved
Template Created by Creating Website Published by Mas Template
Proudly powered by Blogger